Delivery Route Optimisation
Outbound delivery optimization with live GPS tracking and Google Maps / Mapbox integration — allocate deliveries to vehicles by capacity, group geographically, track drivers in real time, capture proof of delivery, and manage return eligibility.
Capacity-Based Allocation
Allocates deliveries to trucks, vans, and bikes based on weight and volume capacity limits. Auto-switches to the next available vehicle when the current one is full.
Geographic Route Grouping
Groups delivery stops geographically for efficient routing. Multi-warehouse support with nearest-warehouse assignment for each delivery zone.
Live GPS Tracking
Real-time GPS position updates from driver devices. Managers see the live vehicle location on a map widget. Full tracking history stored per route.
Google Maps & Mapbox Integration
Google Maps API as the primary map provider with Mapbox as a seamless fallback. Configurable API keys in Settings.
Driver Notifications
Automated email notifications sent to drivers when new deliveries are assigned and when routes are confirmed. No manual communication needed.
Proof of Delivery
Drivers capture proof of delivery with timestamp and GPS location. Records stored against each delivery stop for audit and dispute resolution.
Return Eligibility Checks
Evaluate return requests against configurable return windows. Links to sales orders, invoices, and delivery orders. Approve or reject with one click.
Backend & Portal Views
Full backend management for managers and a customer-facing portal view for tracking delivery status in real time.
Multi-Warehouse Support
Routes are scoped to warehouses. Nearest-warehouse assignment ensures deliveries are dispatched from the most efficient origin point.
Supported Vehicle Types
Truck
High capacity — heavy loads and bulk deliveries
Van
Medium capacity — standard parcel deliveries
Bike
Low weight — last-mile urban deliveries
Motorcycle
Fast & agile — express and small parcels
Route Lifecycle
Install the Module
Go to Apps, search for SHD Delivery Route Optimisation, and click Install. Standard dependencies (stock, sale_stock, purchase_stock, delivery, mail, portal) are installed automatically.
-
Configure API Keys
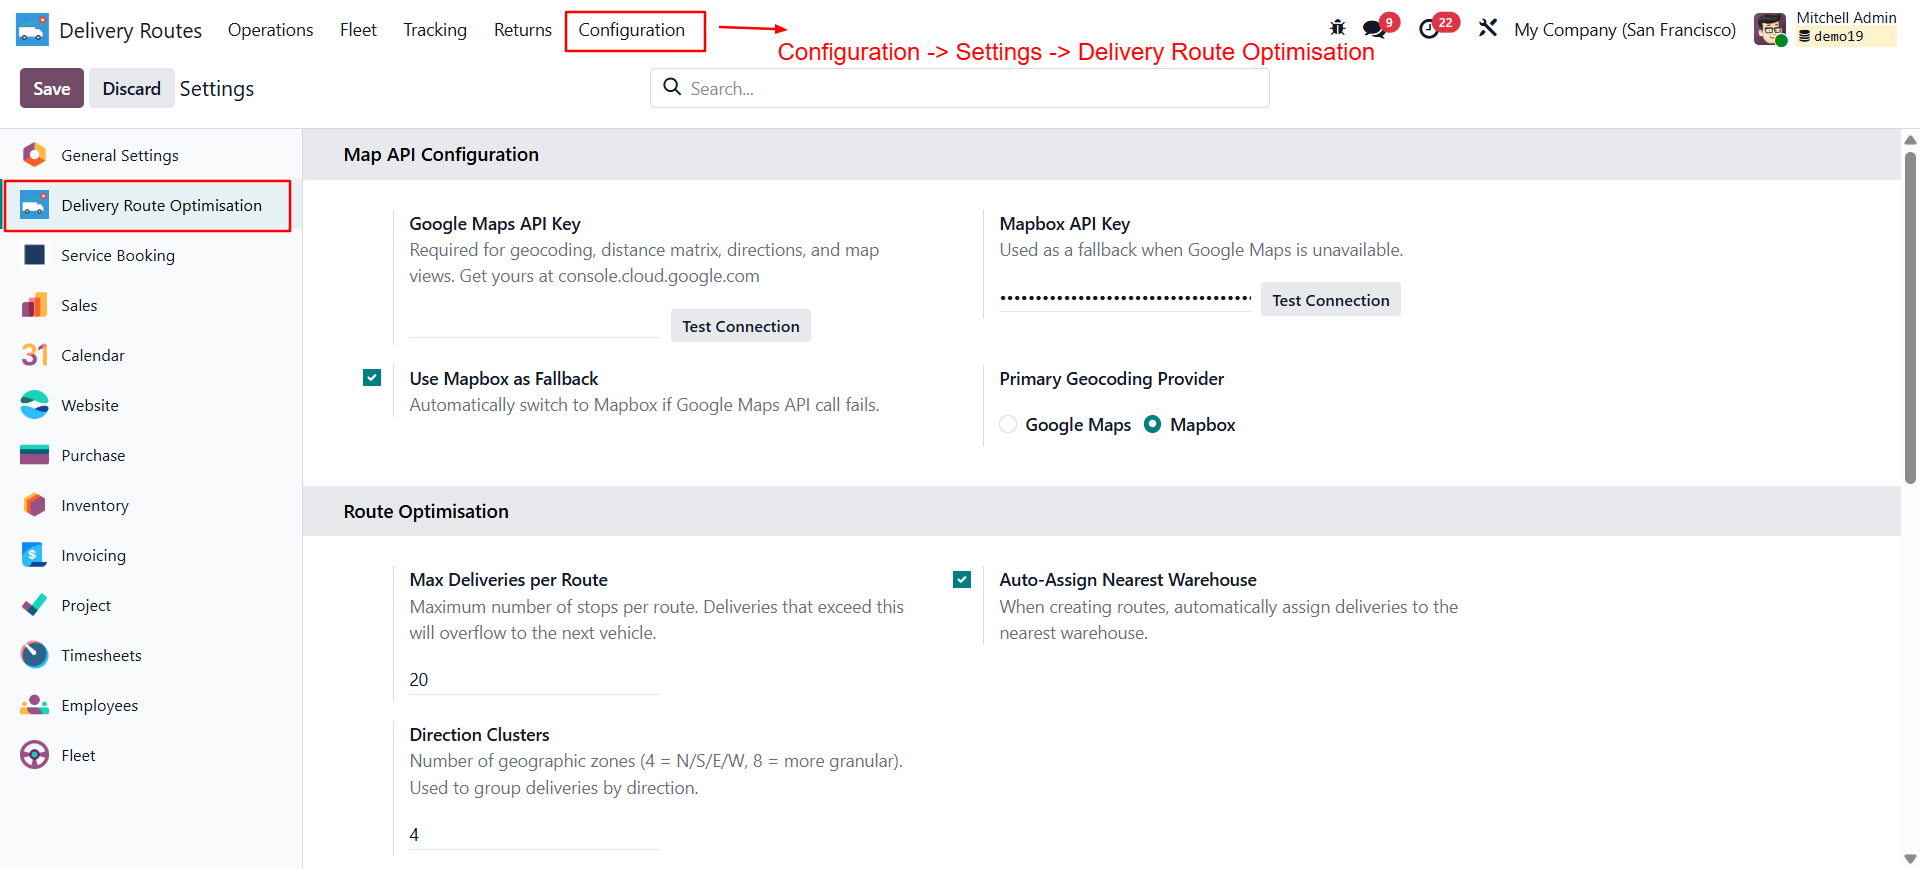
Configure the API configuration for the google map api or mapbox api key. Go to Settings → Delivery Route section:
- Google Maps API Key — Primary map provider. Obtain from Google Cloud Console with Maps JavaScript API and Directions API enabled.
- Mapbox API Key — Fallback provider. Obtain from mapbox.com. Optional if Google Maps is configured.
- Return Window Days — Default number of days within which returns are accepted (default 30).
-
Create Delivery Resources (Vehicles)
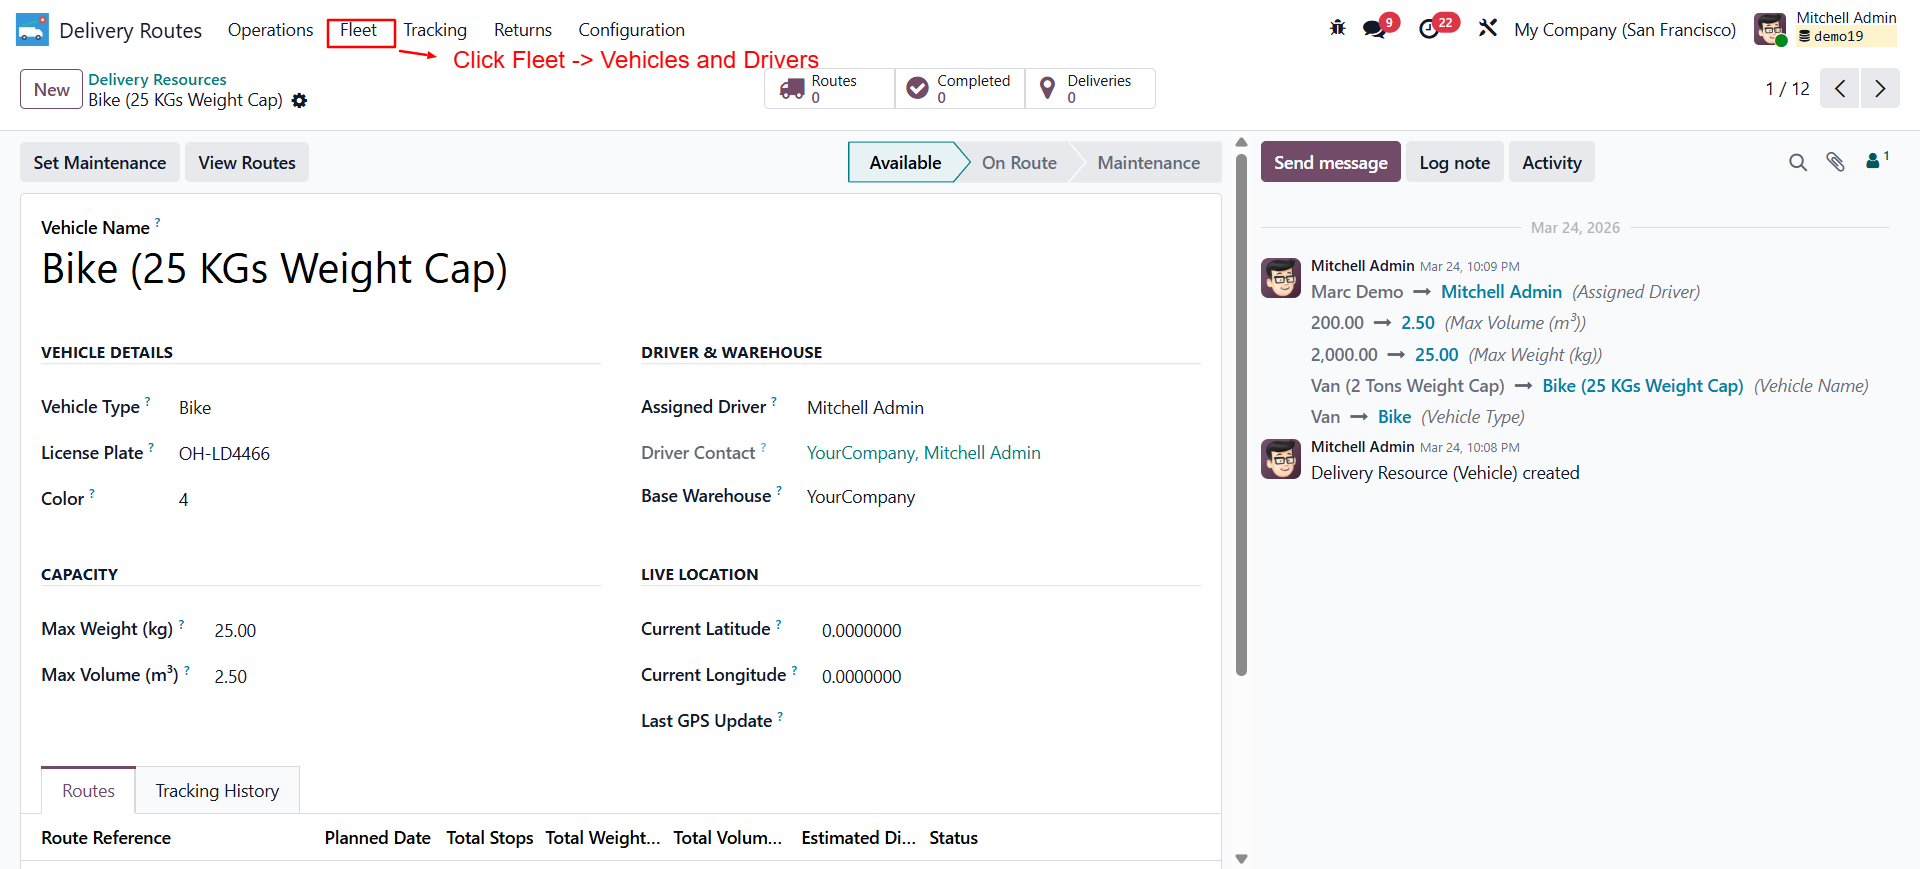
Create Vehicle and drivers information which can be used in assigning confirmed deliveries. 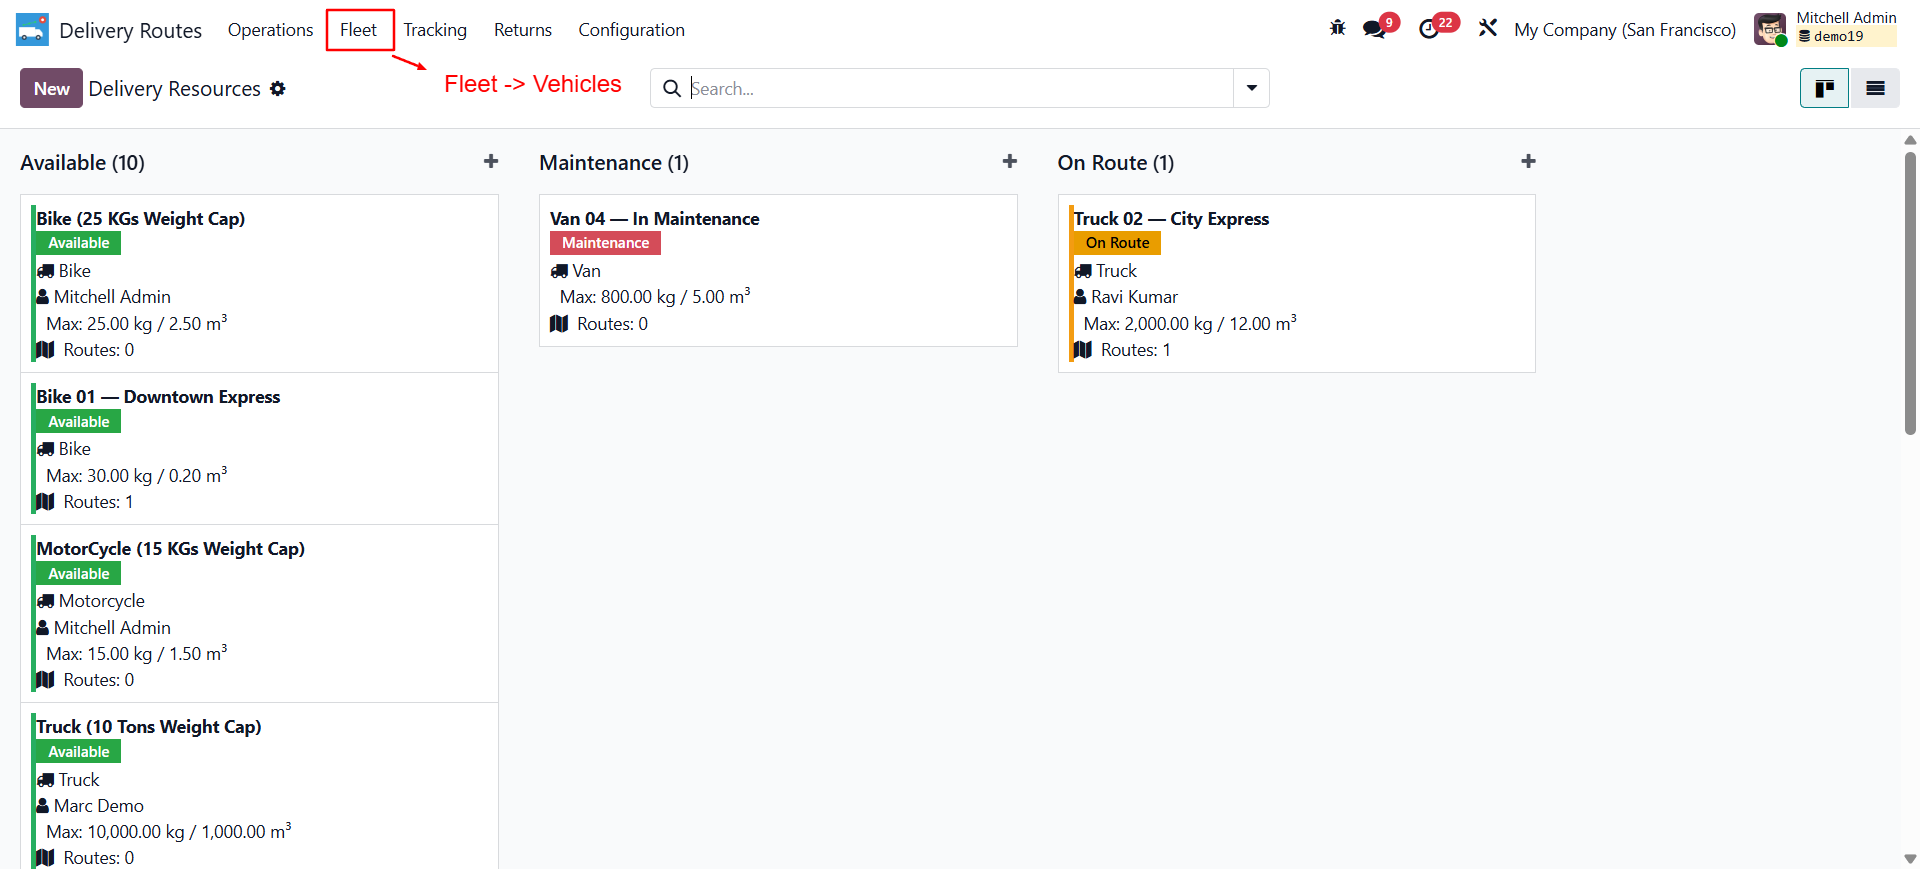
Vehicle status display screen. Go to Delivery Routes → Configuration → Vehicles → New.
Field Description Vehicle Name Display name (e.g. "Van 01 — Mumbai") Vehicle Type Truck / Van / Bike / Motorcycle License Plate Must be unique across all vehicles Assigned Driver Internal Odoo user (not portal) — receives notifications Base Warehouse Origin warehouse for routes assigned to this vehicle Max Weight (kg) Maximum payload weight. Route allocation respects this limit. Max Volume (m³) Maximum payload volume. Auto-switch triggers when exceeded. Assign Deliveries to a Route
Open confirmed stock picking (delivery) records. Use the Assign to Route wizard to allocate them to a vehicle route. The wizard respects weight/volume limits and auto-switches vehicles when full.
Confirm and Dispatch Routes
Go to Delivery Routes → Routes. Open a draft route and click Confirm. The driver receives an email notification with their assigned stops.
Configure Return Eligibility Window
Go to Settings → Delivery Route → Return Window Days. Set the default return window. Individual return checks can override this per request.
Receiving a Route Assignment
When a manager confirms a route, you will receive an automated email notification listing your assigned delivery stops for the day. The notification includes the planned date, number of stops, and a link to your route in the Odoo portal.
Starting Your Route
Log in to the Odoo Portal
Open your browser and log in to
/webor use the Odoo mobile app. Navigate to Delivery Routes in the portal menu.Open Your Assigned Route
Your active route appears at the top. Review all stops and their sequence before departing from the warehouse.
Click Start Route
This transitions the route to In Progress and begins GPS tracking. Your location is updated in real time and visible to your manager.
Completing Each Delivery Stop
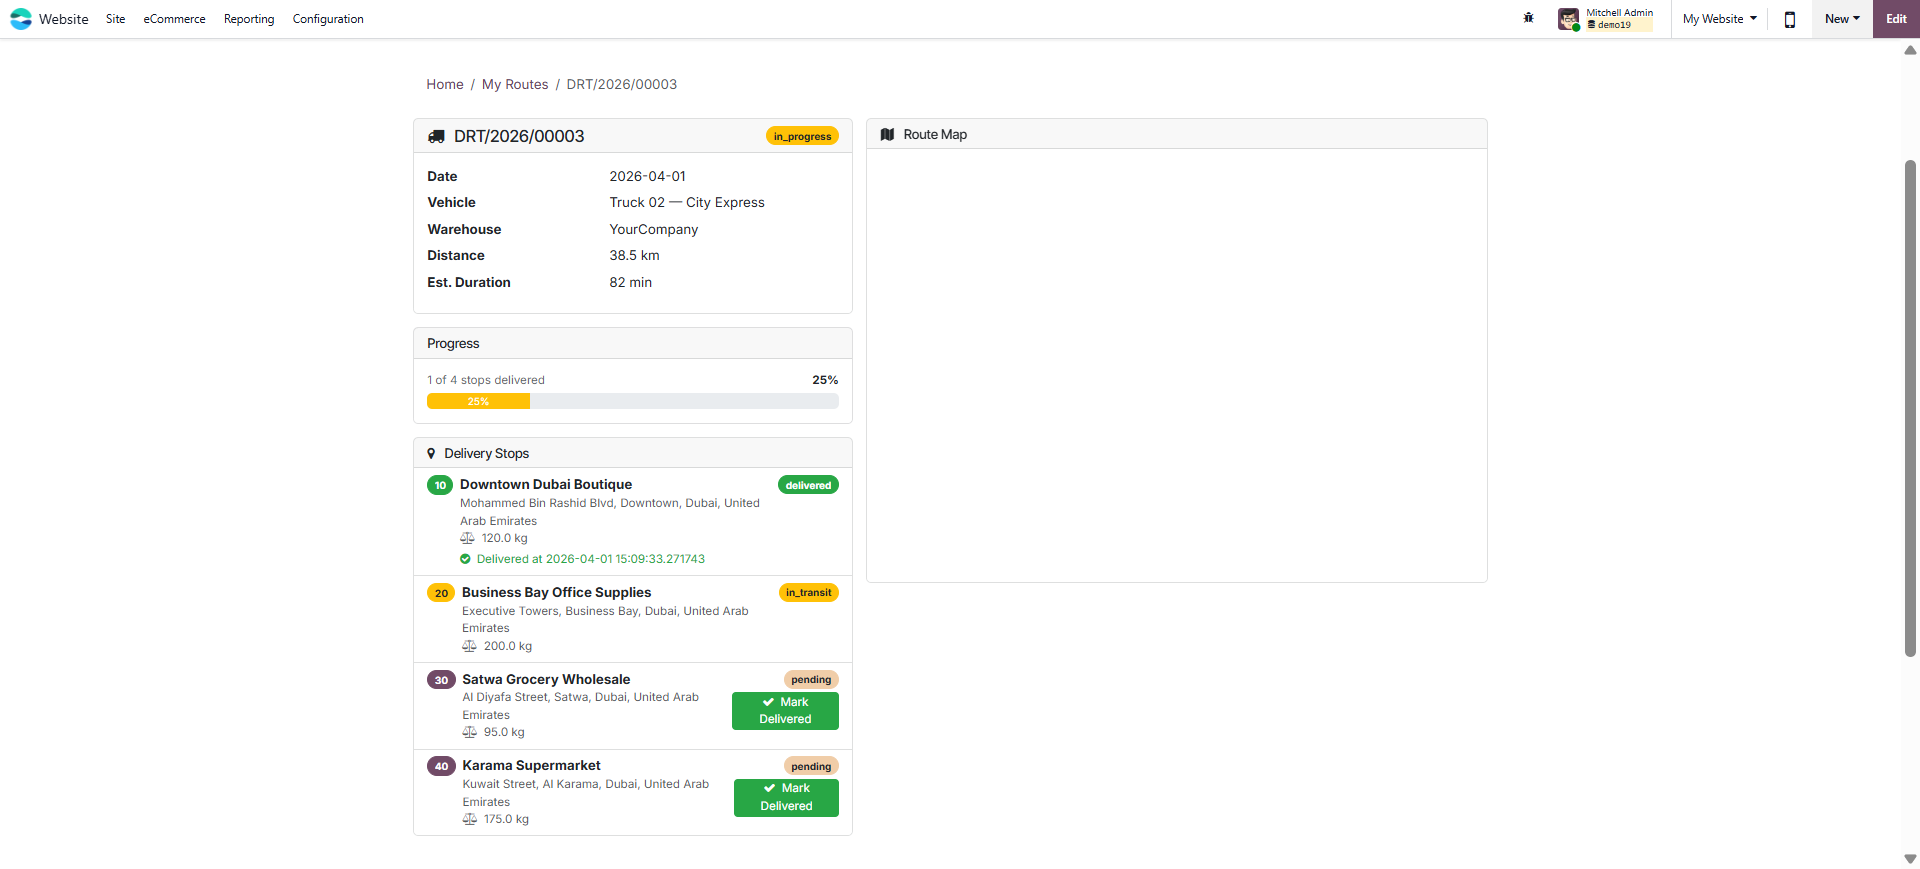
Navigate to the Stop
Click the Open in Maps button on the stop to open Google Maps / Mapbox navigation to the delivery address.
Deliver and Capture Proof
Hand over the goods and click Mark as Delivered. The system records the timestamp and your current GPS coordinates as proof of delivery.
Handle Non-Delivery
If the customer is unavailable or refuses delivery, select the appropriate reason and click Mark as Failed. The manager will be notified immediately.
Completing Your Route
Once all stops are processed, click Complete Route. The route transitions to Done state and GPS tracking stops. Your completion time is recorded automatically.
Vehicle Status Actions
| Action | When to use |
|---|---|
| Set Available | When returning from a route and the vehicle is ready for new assignments |
| Set Maintenance | When the vehicle requires servicing — removes it from allocation |
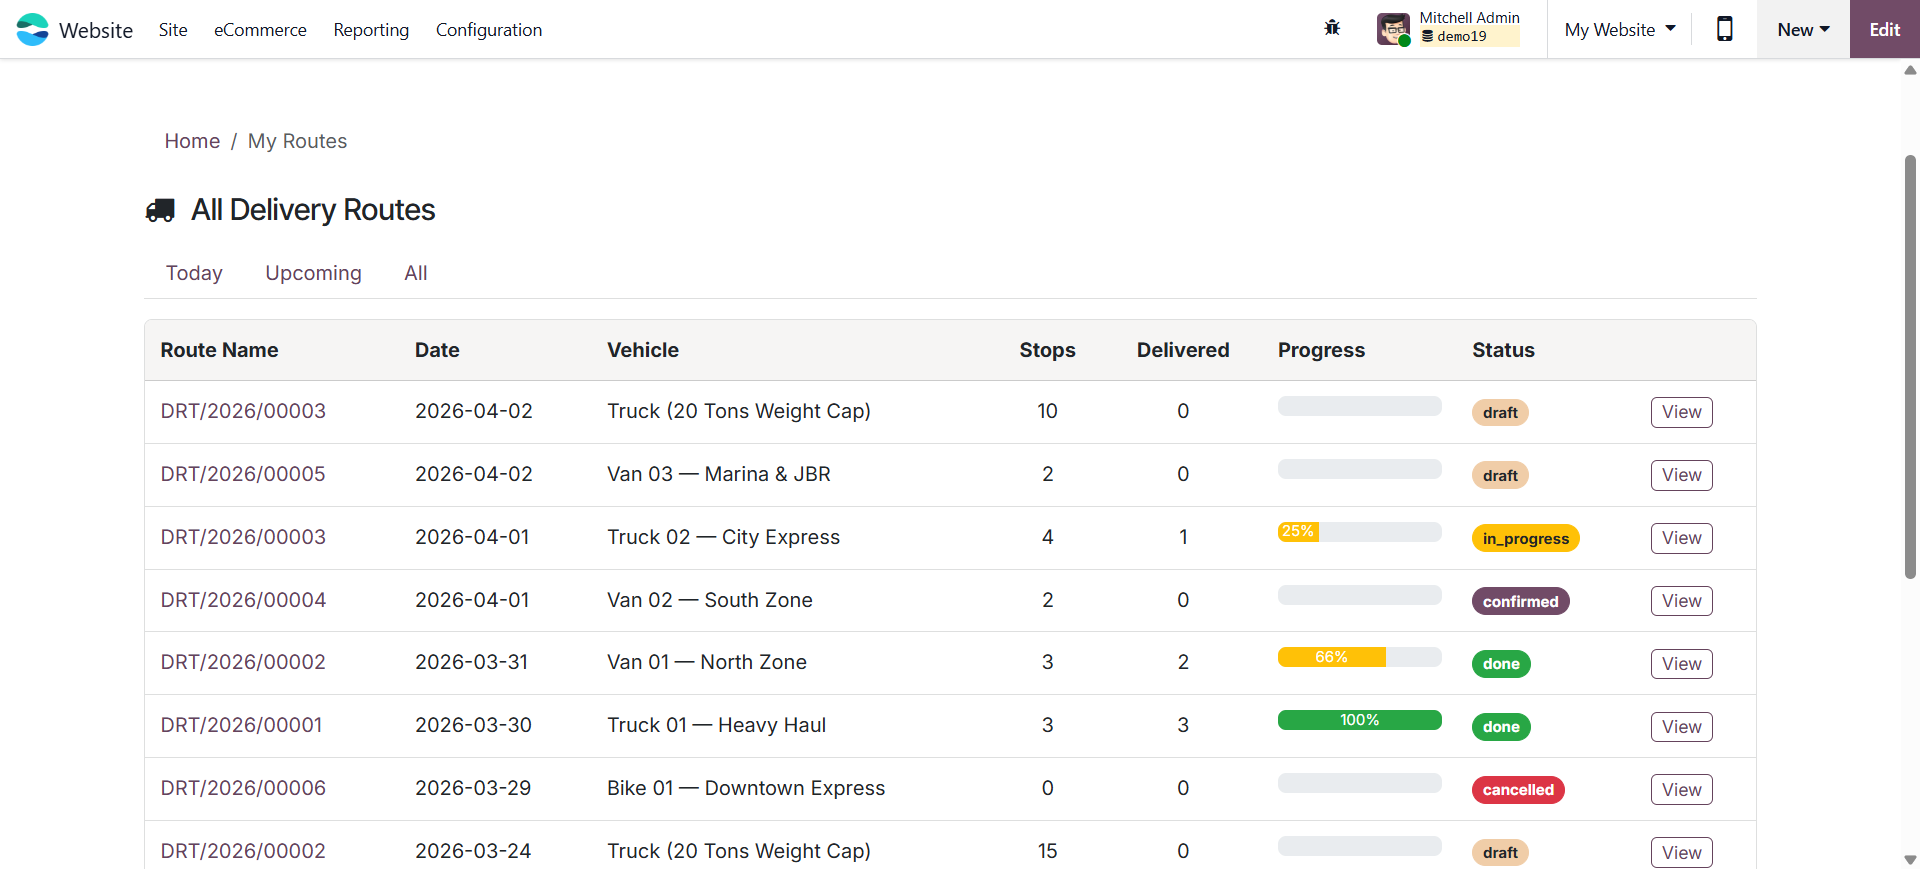
Route Management Overview
Live GPS Tracking
Go to Delivery Routes → Live Tracking to see the real-time map view showing all active vehicles. The map widget refreshes automatically and shows the last known position, vehicle type, driver name, and active route for each vehicle.
Route Performance & Analytics
| Metric | Where to find it |
|---|---|
| Total routes per vehicle | Vehicle form → Statistics section |
| Completed routes | Vehicle form → Completed Routes count |
| Total deliveries handled | Vehicle form → Total Deliveries |
| Route duration | Route form → Date Started / Date Completed |
| Tracking history | Route form → Tracking tab (all GPS pings) |
Return Eligibility Management
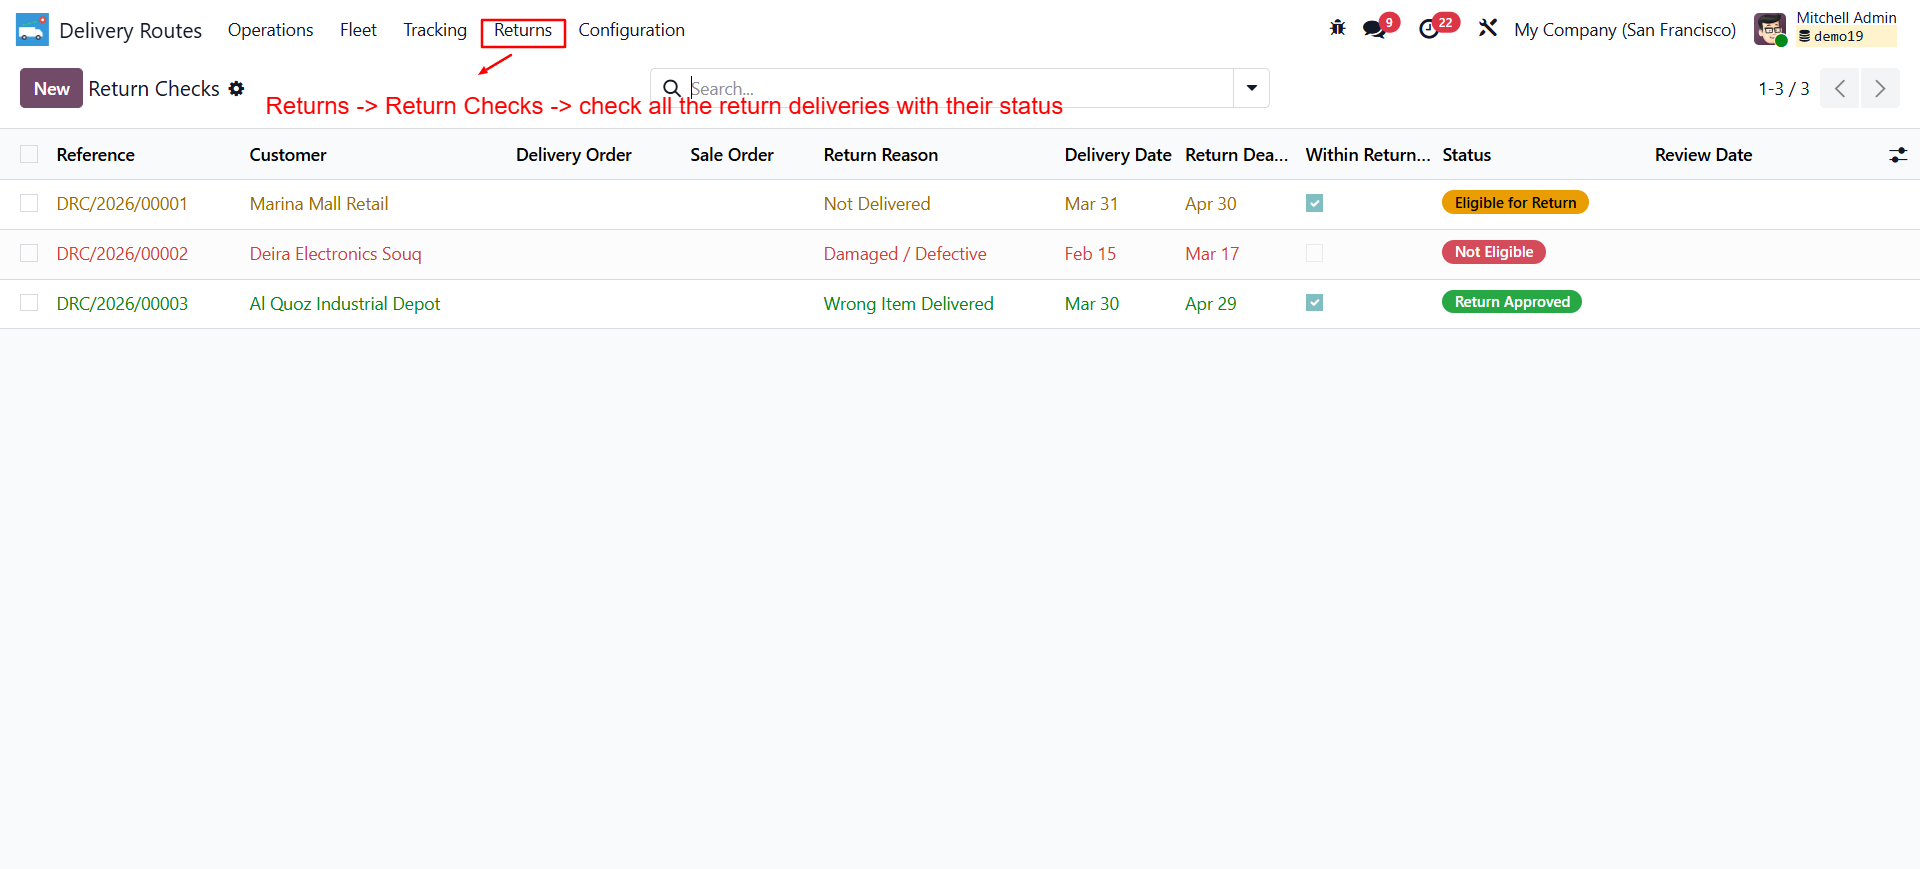
Go to Delivery Routes → Returns to manage return requests.
Create a Return Check
Click New. Link to the delivery order (stock.picking), sale order, or invoice. Set the customer and delivery date.
Check Eligibility
Click Check Eligibility. The system evaluates: return window (configurable days), delivery completion status, and invoice payment state. Result is Eligible or Not Eligible with reasons.
Approve or Reject
For eligible returns, click Approve Return — a return stock picking is created automatically. For rejections, click Reject Return with review notes.
Return Reasons
| Reason | Description |
|---|---|
| Damaged / Defective | Item arrived in unusable condition |
| Wrong Item Delivered | Customer received incorrect product |
| Not Delivered | Delivery marked done but customer disputes receipt |
| Customer Refusal | Customer refused delivery at the door |
| Other | Reason captured in notes field |
Vehicle Status Overview
| Status | Meaning | Available for Allocation? |
|---|---|---|
| Available | Vehicle is ready for new route assignments | ✅ Yes |
| On Route | Vehicle is currently on an active delivery route | ⚠️ Limited |
| Maintenance | Vehicle is undergoing servicing or repair | ❌ No |
| Inactive | Vehicle is retired or permanently out of service | ❌ No |
Need Custom Delivery Logic or Map Integrations?
Shadail Technology can extend this module with custom routing algorithms, third-party logistics APIs, or custom portal views.
Contact UsDelivery Route Optimisation
Outbound delivery optimization with live GPS tracking and Google Maps / Mapbox integration — allocate deliveries to vehicles by capacity, group geographically, track drivers in real time, capture proof of delivery, and manage return eligibility.
Capacity-Based Allocation
Allocates deliveries to trucks, vans, and bikes based on weight and volume capacity limits. Auto-switches to the next available vehicle when the current one is full.
Geographic Route Grouping
Groups delivery stops geographically for efficient routing. Multi-warehouse support with nearest-warehouse assignment for each delivery zone.
Live GPS Tracking
Real-time GPS position updates from driver devices. Managers see the live vehicle location on a map widget. Full tracking history stored per route.
Google Maps & Mapbox Integration
Google Maps API as the primary map provider with Mapbox as a seamless fallback. Configurable API keys in Settings.
Driver Notifications
Automated email notifications sent to drivers when new deliveries are assigned and when routes are confirmed. No manual communication needed.
Proof of Delivery
Drivers capture proof of delivery with timestamp and GPS location. Records stored against each delivery stop for audit and dispute resolution.
Return Eligibility Checks
Evaluate return requests against configurable return windows. Links to sales orders, invoices, and delivery orders. Approve or reject with one click.
Backend & Portal Views
Full backend management for managers and a customer-facing portal view for tracking delivery status in real time.
Multi-Warehouse Support
Routes are scoped to warehouses. Nearest-warehouse assignment ensures deliveries are dispatched from the most efficient origin point.
Supported Vehicle Types
Truck
High capacity — heavy loads and bulk deliveries
Van
Medium capacity — standard parcel deliveries
Bike
Low weight — last-mile urban deliveries
Motorcycle
Fast & agile — express and small parcels
Route Lifecycle
Install the Module
Go to Apps, search for SHD Delivery Route Optimisation, and click Install. Standard dependencies (stock, sale_stock, purchase_stock, delivery, mail, portal) are installed automatically.
-
Configure API Keys
Configure the API configuration for the google map api or mapbox api key. Go to Settings → Delivery Route section:
- Google Maps API Key — Primary map provider. Obtain from Google Cloud Console with Maps JavaScript API and Directions API enabled.
- Mapbox API Key — Fallback provider. Obtain from mapbox.com. Optional if Google Maps is configured.
- Return Window Days — Default number of days within which returns are accepted (default 30).
-
Create Delivery Resources (Vehicles)
Create Vehicle and drivers information which can be used in assigning confirmed deliveries.
Vehicle status display screen. Go to Delivery Routes → Configuration → Vehicles → New.
Field Description Vehicle Name Display name (e.g. "Van 01 — Mumbai") Vehicle Type Truck / Van / Bike / Motorcycle License Plate Must be unique across all vehicles Assigned Driver Internal Odoo user (not portal) — receives notifications Base Warehouse Origin warehouse for routes assigned to this vehicle Max Weight (kg) Maximum payload weight. Route allocation respects this limit. Max Volume (m³) Maximum payload volume. Auto-switch triggers when exceeded. Assign Deliveries to a Route
Open confirmed stock picking (delivery) records. Use the Assign to Route wizard to allocate them to a vehicle route. The wizard respects weight/volume limits and auto-switches vehicles when full.
Confirm and Dispatch Routes
Go to Delivery Routes → Routes. Open a draft route and click Confirm. The driver receives an email notification with their assigned stops.
Configure Return Eligibility Window
Go to Settings → Delivery Route → Return Window Days. Set the default return window. Individual return checks can override this per request.
Receiving a Route Assignment
When a manager confirms a route, you will receive an automated email notification listing your assigned delivery stops for the day. The notification includes the planned date, number of stops, and a link to your route in the Odoo portal.
Starting Your Route
Log in to the Odoo Portal
Open your browser and log in to
/webor use the Odoo mobile app. Navigate to Delivery Routes in the portal menu.Open Your Assigned Route
Your active route appears at the top. Review all stops and their sequence before departing from the warehouse.
Click Start Route
This transitions the route to In Progress and begins GPS tracking. Your location is updated in real time and visible to your manager.
Completing Each Delivery Stop
Navigate to the Stop
Click the Open in Maps button on the stop to open Google Maps / Mapbox navigation to the delivery address.
Deliver and Capture Proof
Hand over the goods and click Mark as Delivered. The system records the timestamp and your current GPS coordinates as proof of delivery.
Handle Non-Delivery
If the customer is unavailable or refuses delivery, select the appropriate reason and click Mark as Failed. The manager will be notified immediately.
Completing Your Route
Once all stops are processed, click Complete Route. The route transitions to Done state and GPS tracking stops. Your completion time is recorded automatically.
Vehicle Status Actions
| Action | When to use |
|---|---|
| Set Available | When returning from a route and the vehicle is ready for new assignments |
| Set Maintenance | When the vehicle requires servicing — removes it from allocation |
Route Management Overview
Live GPS Tracking
Go to Delivery Routes → Live Tracking to see the real-time map view showing all active vehicles. The map widget refreshes automatically and shows the last known position, vehicle type, driver name, and active route for each vehicle.
Route Performance & Analytics
| Metric | Where to find it |
|---|---|
| Total routes per vehicle | Vehicle form → Statistics section |
| Completed routes | Vehicle form → Completed Routes count |
| Total deliveries handled | Vehicle form → Total Deliveries |
| Route duration | Route form → Date Started / Date Completed |
| Tracking history | Route form → Tracking tab (all GPS pings) |
Return Eligibility Management
Go to Delivery Routes → Returns to manage return requests.
Create a Return Check
Click New. Link to the delivery order (stock.picking), sale order, or invoice. Set the customer and delivery date.
Check Eligibility
Click Check Eligibility. The system evaluates: return window (configurable days), delivery completion status, and invoice payment state. Result is Eligible or Not Eligible with reasons.
Approve or Reject
For eligible returns, click Approve Return — a return stock picking is created automatically. For rejections, click Reject Return with review notes.
Return Reasons
| Reason | Description |
|---|---|
| Damaged / Defective | Item arrived in unusable condition |
| Wrong Item Delivered | Customer received incorrect product |
| Not Delivered | Delivery marked done but customer disputes receipt |
| Customer Refusal | Customer refused delivery at the door |
| Other | Reason captured in notes field |
Vehicle Status Overview
| Status | Meaning | Available for Allocation? |
|---|---|---|
| Available | Vehicle is ready for new route assignments | ✅ Yes |
| On Route | Vehicle is currently on an active delivery route | ⚠️ Limited |
| Maintenance | Vehicle is undergoing servicing or repair | ❌ No |
| Inactive | Vehicle is retired or permanently out of service | ❌ No |
Need Custom Delivery Logic or Map Integrations?
Shadail Technology can extend this module with custom routing algorithms, third-party logistics APIs, or custom portal views.
Contact Us