Backend Authorize.Net Management
Full Authorize.Net integration for Odoo 19 — manage customer profiles, card and ACH tokens, authorize-only or auth-and-capture flows, auto-capture on delivery, partial captures, and full/partial refunds, all from the Odoo backend.
Customer Profile Management
Create and update Authorize.Net customer profiles directly from the Partner form. Profile ID stored and synced automatically on the partner record.
Card & ACH Token Management
Add credit card and ACH bank account tokens manually via wizard, or fetch existing payment profiles from Authorize.Net to import previously stored tokens.
Authorize Only Flow
Reserve funds without immediately capturing. Authorised amount is held on the customer's card and captured later — automatically on delivery validation.
Authorize & Capture Flow
Immediately collect payment in a single API call. Ideal for prepaid orders or instant payment collection. Invoice and reconciliation created automatically.
Auto-Capture on Delivery
Hooks into stock picking validation — when the linked delivery order is validated, the authorised amount is captured automatically. No manual intervention needed.
Partial Capture & Re-Auth
Capture partial amounts against an authorisation. The remaining balance is automatically re-authorised on Authorize.Net to keep the hold active.
Refund Wizard
Issue full or partial refunds via the Authorize.Net API directly from the payment transaction form. Instant API processing — no manual gateway login required.
Auto Invoice & Reconciliation
After successful capture, invoices are created and reconciled automatically against the payment transaction. Accounting entries generated without manual steps.
Multi-Document Support
Process payments against Sales Orders, Purchase Orders, and Invoices from a single unified wizard interface built on the Backend Payment Core Connector.
shd_backend_payment_core and Odoo's built-in payment_authorize must be installed before this module.Install Dependencies
Ensure these modules are installed first:
shd_backend_payment_core— Shadail Technology Backend Payment Corepayment_authorize— Odoo's built-in Authorize.Net providersale_stock— Required for auto-capture on delivery
Configure Authorize.Net Provider
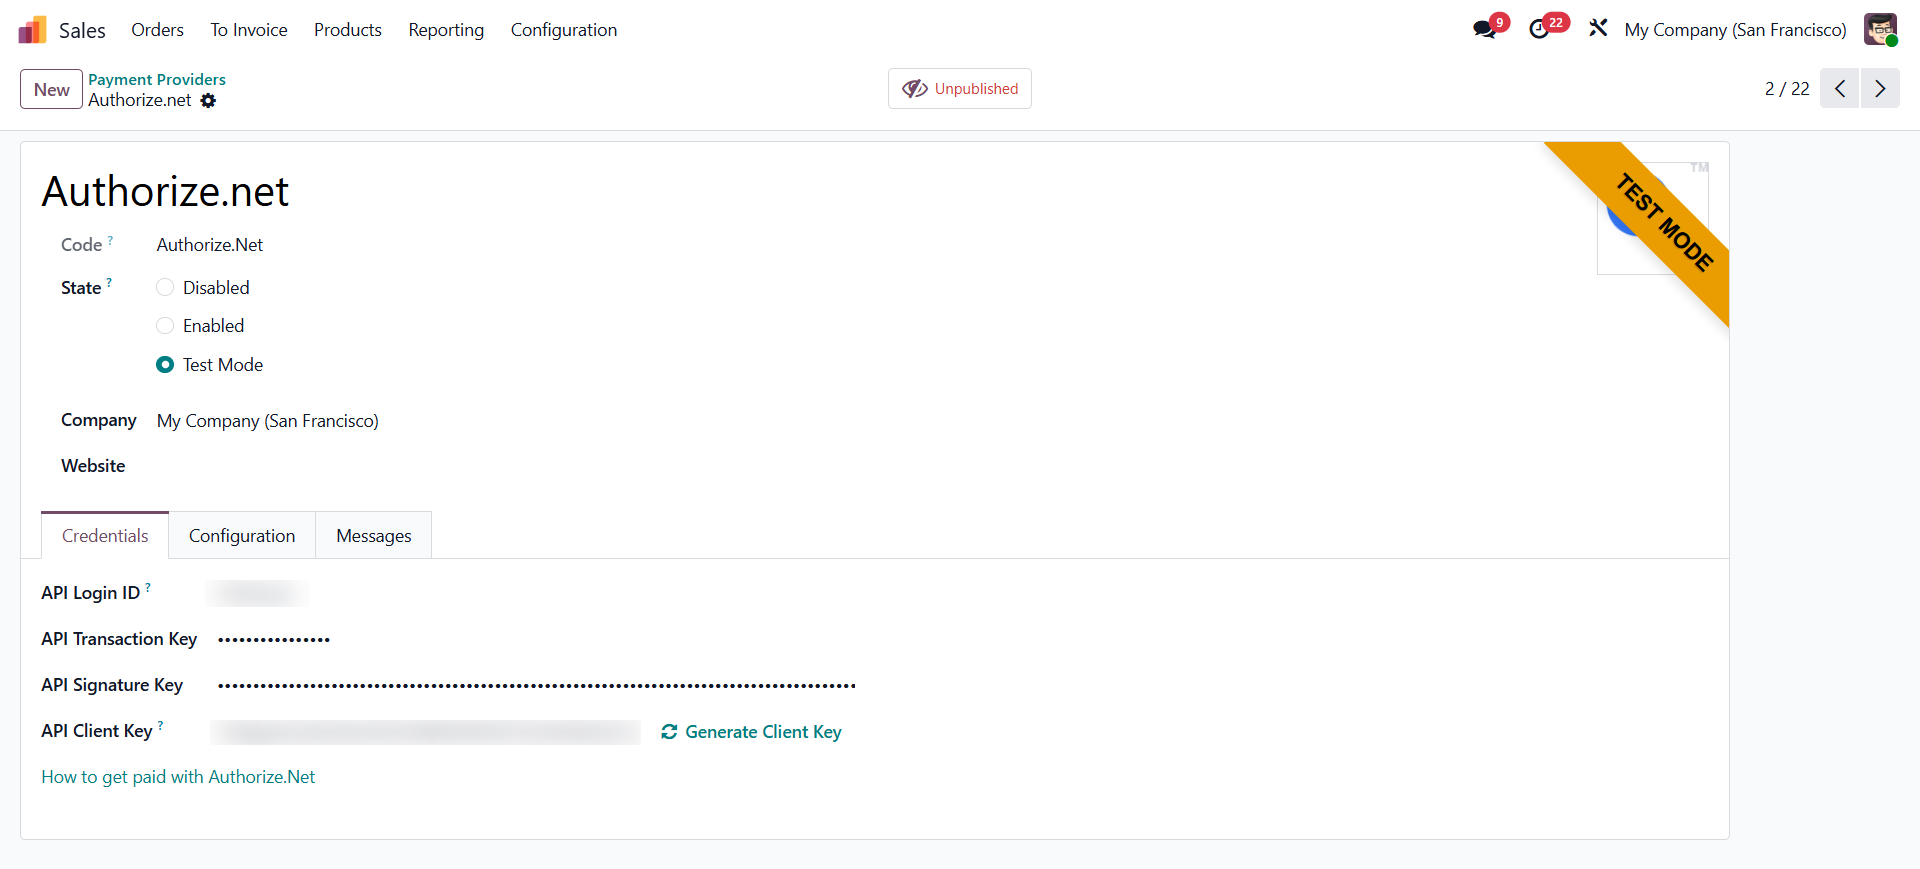
Configure the authorize.net payment provider. Go to Accounting → Configuration → Payment Providers → Authorize.Net.
- Enter your API Login ID and Transaction Key from your Authorize.Net merchant account.
- Set state to Test for sandbox testing or Enabled for live processing.
- Set Payment Flow default (can be overridden per transaction).
Install This Module
Go to Apps, search for Authorize.Net Management, and click Install.
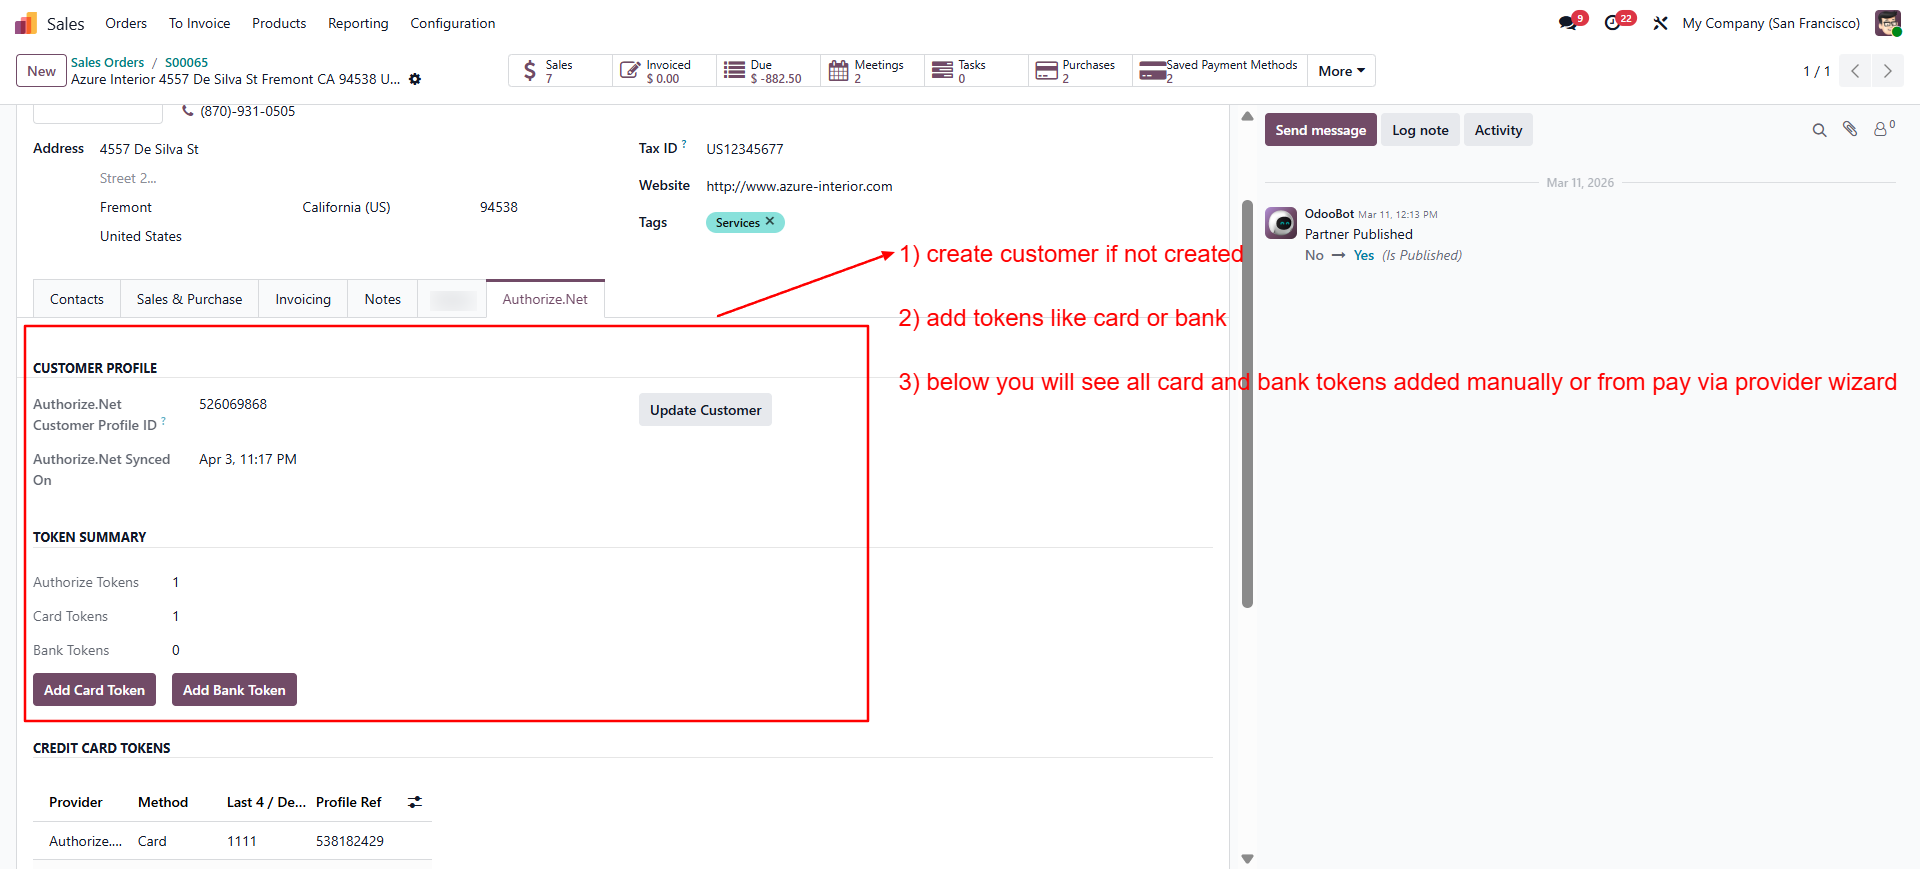
Create a Customer Profile for a Partner
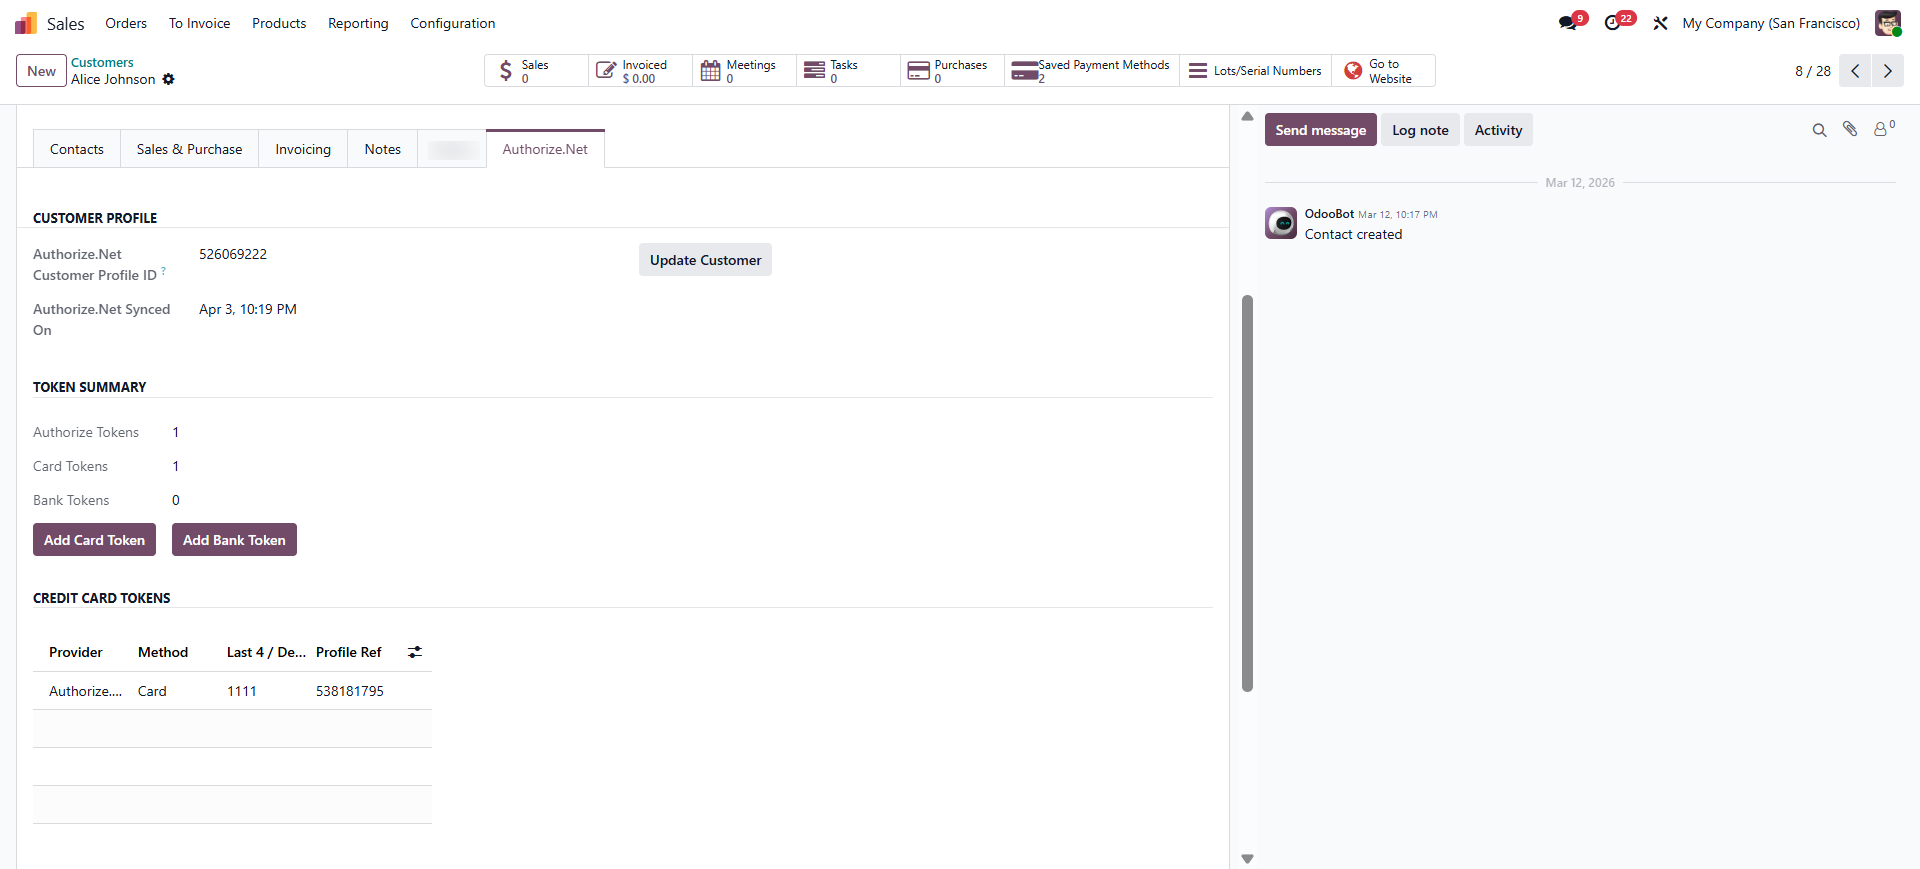
Configure the customer creation for authorize provider. Open any customer's partner record. Go to the Authorize.Net tab. Click Create Customer Profile to register the partner on Authorize.Net. The profile ID is stored automatically.
Add Payment Tokens
On the Authorize.Net tab, click Add Card Token or Add Bank Account Token to create a new payment profile — or click Fetch from Authorize.Net to import existing profiles from the gateway.
Verify Auto-Capture Configuration
Auto-capture is enabled by default. When a delivery order linked to a Sales Order with an authorised transaction is validated, the capture fires automatically. No additional configuration needed.
🔒 Authorize Only → Capture on Delivery
Reserve funds at order time. Capture automatically when the delivery order is validated. Best for businesses that ship physical goods.
⚡ Authorize & Capture (Immediate)
Collect payment immediately in a single step. Best for prepaid orders, services, and digital goods where instant collection is required.
Flow 1 — Authorize Only → Auto Capture on Delivery
Flow 2 — Authorize & Capture (Immediate)
Partial Capture Flow
Issuing a Refund
Open the Completed Transaction
Go to Accounting → Payments → Transactions and open a transaction with state Done.
Click Authorize Refund
The Authorize Refund button appears on completed Authorize.Net transactions.
Enter Refund Amount
Enter the amount to refund (must be ≤ original transaction amount). Click Confirm — the refund is processed via the Authorize.Net API immediately.
Authorize.Net Tab on the Partner Form
| Section | Available Actions |
|---|---|
| Customer Profile | View profile ID & sync date · Create Customer Profile · Update Profile (pushes name/email/phone to Authorize.Net) |
| Credit Cards | List tokens (last 4, card type) · Add Card Token · Fetch from Authorize.Net · Remove individual cards |
| Bank Accounts (ACH) | List tokens (last 4, bank name, account type) · Add Bank Account Token · Fetch from Authorize.Net · Remove individual accounts |
Adding a Card Token Manually
Open Partner → Authorize.Net Tab
Ensure the customer profile is already created. Click Add Card Token.
Enter Card Details
In the wizard, enter the card number, expiry month, expiry year, and CVV. These are sent directly to Authorize.Net to create a payment profile — raw card data is not stored in Odoo.
Save Token
Confirm — the payment profile ID is stored as a
payment.tokenrecord linked to the partner.
Adding an ACH Bank Account Token
Click Add Bank Account Token
On the Authorize.Net tab, click Add Bank Account Token.
Enter Bank Details
Enter routing number, account number, account type (Checking / Savings / Business Checking), name on account, bank name, and eCheck type (PPD / WEB / CCD).
Save Token
Confirm — the ACH payment profile is created on Authorize.Net and a token record is saved in Odoo.
Fetching Existing Profiles from Authorize.Net
If the customer already has payment profiles stored on Authorize.Net (from a previous system or direct API usage), click Fetch from Authorize.Net on the token wizard. This retrieves all existing payment profiles for the customer profile ID and displays them for selection. Choose the profile to import into Odoo as a token record.
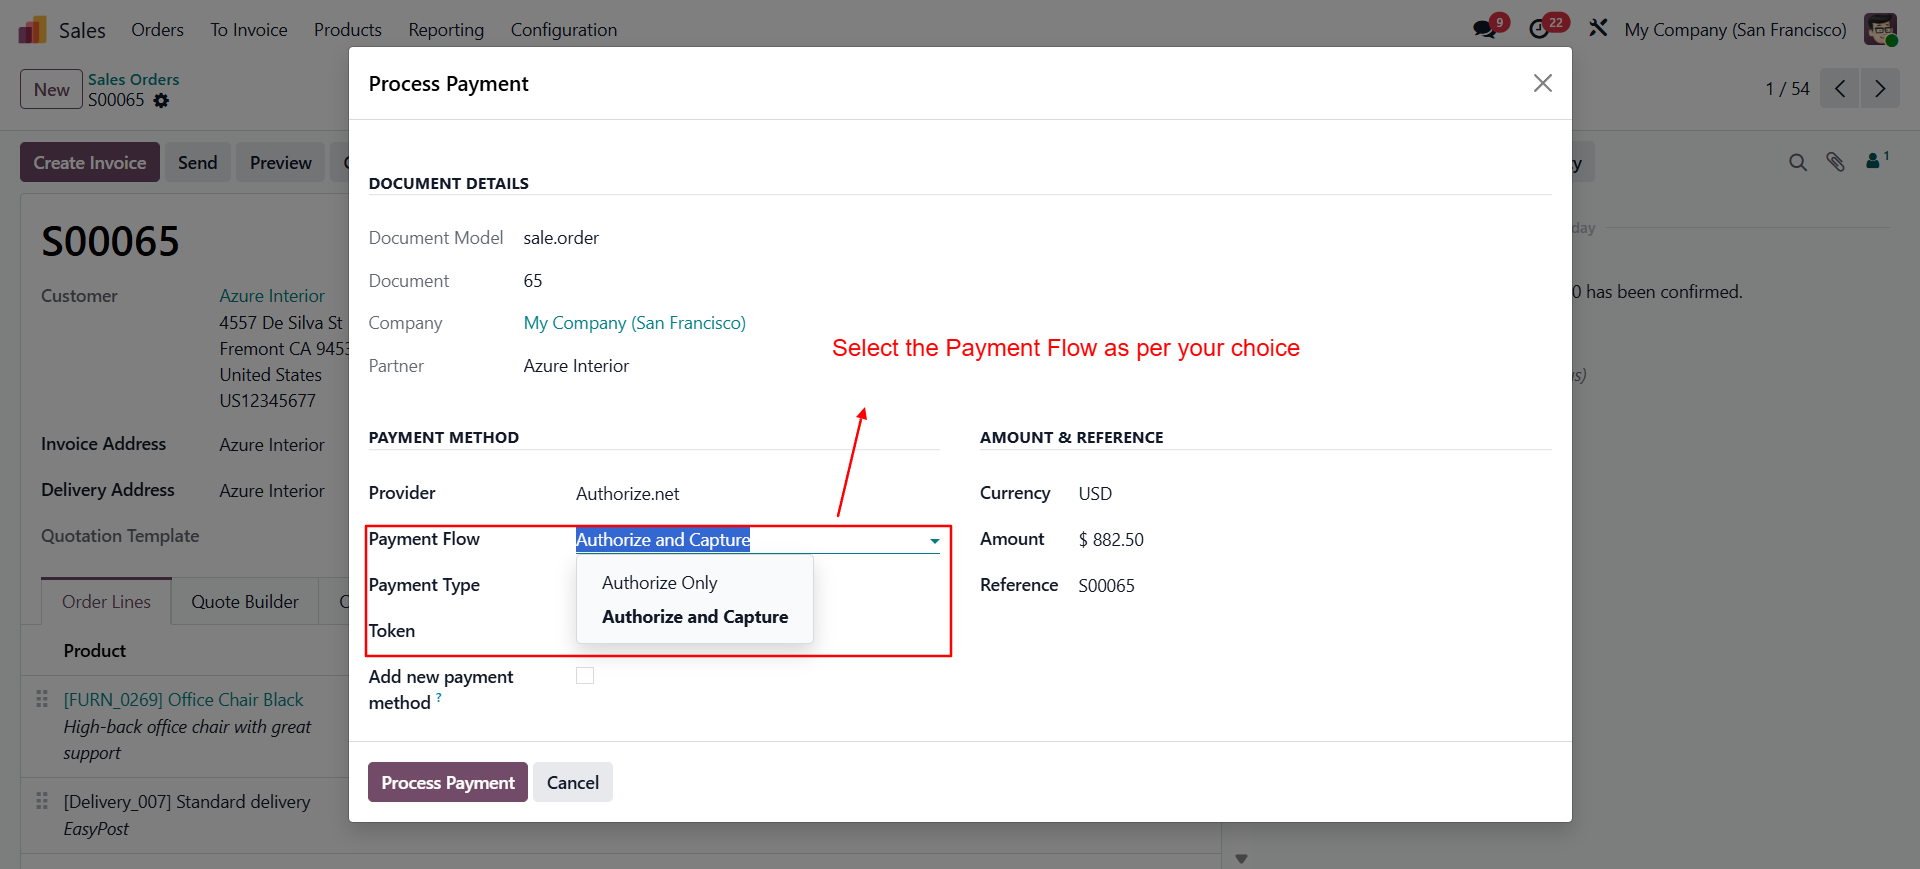
Payment Wizard Fields (Authorize.Net Specific)
| Field | Options | Description |
|---|---|---|
| Payment Flow | Authorize Only · Auth & Capture | Controls whether funds are reserved or immediately collected |
| Payment Type | Credit Card · Bank Account | Filters the token list to the selected payment type |
| Token | Partner's active tokens | Filtered by partner, provider, and payment type automatically |
Questions About Your Authorize.Net Setup?
Our Odoo payment integration team at Shadail Technology is ready to help with configuration, customisation, and support.
Contact UsBackend Authorize.Net Management
Full Authorize.Net integration for Odoo 19 — manage customer profiles, card and ACH tokens, authorize-only or auth-and-capture flows, auto-capture on delivery, partial captures, and full/partial refunds, all from the Odoo backend.
Customer Profile Management
Create and update Authorize.Net customer profiles directly from the Partner form. Profile ID stored and synced automatically on the partner record.
Card & ACH Token Management
Add credit card and ACH bank account tokens manually via wizard, or fetch existing payment profiles from Authorize.Net to import previously stored tokens.
Authorize Only Flow
Reserve funds without immediately capturing. Authorised amount is held on the customer's card and captured later — automatically on delivery validation.
Authorize & Capture Flow
Immediately collect payment in a single API call. Ideal for prepaid orders or instant payment collection. Invoice and reconciliation created automatically.
Auto-Capture on Delivery
Hooks into stock picking validation — when the linked delivery order is validated, the authorised amount is captured automatically. No manual intervention needed.
Partial Capture & Re-Auth
Capture partial amounts against an authorisation. The remaining balance is automatically re-authorised on Authorize.Net to keep the hold active.
Refund Wizard
Issue full or partial refunds via the Authorize.Net API directly from the payment transaction form. Instant API processing — no manual gateway login required.
Auto Invoice & Reconciliation
After successful capture, invoices are created and reconciled automatically against the payment transaction. Accounting entries generated without manual steps.
Multi-Document Support
Process payments against Sales Orders, Purchase Orders, and Invoices from a single unified wizard interface built on the Backend Payment Core Connector.
shd_backend_payment_core and Odoo's built-in payment_authorize must be installed before this module.Install Dependencies
Ensure these modules are installed first:
shd_backend_payment_core— Shadail Technology Backend Payment Corepayment_authorize— Odoo's built-in Authorize.Net providersale_stock— Required for auto-capture on delivery
Configure Authorize.Net Provider
Configure the authorize.net payment provider. Go to Accounting → Configuration → Payment Providers → Authorize.Net.
- Enter your API Login ID and Transaction Key from your Authorize.Net merchant account.
- Set state to Test for sandbox testing or Enabled for live processing.
- Set Payment Flow default (can be overridden per transaction).
Install This Module
Go to Apps, search for Authorize.Net Management, and click Install.
Create a Customer Profile for a Partner
Configure the customer creation for authorize provider. Open any customer's partner record. Go to the Authorize.Net tab. Click Create Customer Profile to register the partner on Authorize.Net. The profile ID is stored automatically.
Add Payment Tokens
On the Authorize.Net tab, click Add Card Token or Add Bank Account Token to create a new payment profile — or click Fetch from Authorize.Net to import existing profiles from the gateway.
Verify Auto-Capture Configuration
Auto-capture is enabled by default. When a delivery order linked to a Sales Order with an authorised transaction is validated, the capture fires automatically. No additional configuration needed.
🔒 Authorize Only → Capture on Delivery
Reserve funds at order time. Capture automatically when the delivery order is validated. Best for businesses that ship physical goods.
⚡ Authorize & Capture (Immediate)
Collect payment immediately in a single step. Best for prepaid orders, services, and digital goods where instant collection is required.
Flow 1 — Authorize Only → Auto Capture on Delivery
Flow 2 — Authorize & Capture (Immediate)
Partial Capture Flow
Issuing a Refund
Open the Completed Transaction
Go to Accounting → Payments → Transactions and open a transaction with state Done.
Click Authorize Refund
The Authorize Refund button appears on completed Authorize.Net transactions.
Enter Refund Amount
Enter the amount to refund (must be ≤ original transaction amount). Click Confirm — the refund is processed via the Authorize.Net API immediately.
Authorize.Net Tab on the Partner Form
| Section | Available Actions |
|---|---|
| Customer Profile | View profile ID & sync date · Create Customer Profile · Update Profile (pushes name/email/phone to Authorize.Net) |
| Credit Cards | List tokens (last 4, card type) · Add Card Token · Fetch from Authorize.Net · Remove individual cards |
| Bank Accounts (ACH) | List tokens (last 4, bank name, account type) · Add Bank Account Token · Fetch from Authorize.Net · Remove individual accounts |
Adding a Card Token Manually
Open Partner → Authorize.Net Tab
Ensure the customer profile is already created. Click Add Card Token.
Enter Card Details
In the wizard, enter the card number, expiry month, expiry year, and CVV. These are sent directly to Authorize.Net to create a payment profile — raw card data is not stored in Odoo.
Save Token
Confirm — the payment profile ID is stored as a
payment.tokenrecord linked to the partner.
Adding an ACH Bank Account Token
Click Add Bank Account Token
On the Authorize.Net tab, click Add Bank Account Token.
Enter Bank Details
Enter routing number, account number, account type (Checking / Savings / Business Checking), name on account, bank name, and eCheck type (PPD / WEB / CCD).
Save Token
Confirm — the ACH payment profile is created on Authorize.Net and a token record is saved in Odoo.
Fetching Existing Profiles from Authorize.Net
If the customer already has payment profiles stored on Authorize.Net (from a previous system or direct API usage), click Fetch from Authorize.Net on the token wizard. This retrieves all existing payment profiles for the customer profile ID and displays them for selection. Choose the profile to import into Odoo as a token record.
Payment Wizard Fields (Authorize.Net Specific)
| Field | Options | Description |
|---|---|---|
| Payment Flow | Authorize Only · Auth & Capture | Controls whether funds are reserved or immediately collected |
| Payment Type | Credit Card · Bank Account | Filters the token list to the selected payment type |
| Token | Partner's active tokens | Filtered by partner, provider, and payment type automatically |
Questions About Your Authorize.Net Setup?
Our Odoo payment integration team at Shadail Technology is ready to help with configuration, customisation, and support.
Contact Us